


As always I will put links to some of the things I used at the end of post. Also check out “my attempt” at putting a video together on how to make this.

Materials
For the lumber I used 3/4″ Plywood. I had enough scrap pieces to put the whole thing together. If you were buying new it would require nothing more than a 2′ x 4′ piece of plywood. For the top I used a 1/4″ tempered pegboard that I picked up at Lowe’s. The top will be cut down to 17-1/2 x 23″ and placed into the top of the box that will have a 1/4″ rabbit cut into it. Although I lucky enough to use scrap for most of my lumber, I still could have easily built this entire project for under $30.
- (1) 3/4″ x 2′ x 4′ Plywood
- (1) 1/4″ x 2′ x 2′ Pegboard
- (1) Universal Dust Port (I got mine from Amazon)
- (1) 3/4” Universal Rubber Bumpers (I got mine from Amazon)
Milling & Assembly
 |
I started by cutting the top of the sanding table. I used 3/16″ thick pegboard. In hindsight I think I would have preferred 1/4″ thick pegboard. The table has just a little bit of give to it. I think that extra 1/16″ would have shored it up. I cut the pegboard 17-1/2″ x 23″ using my tablesaw. |
 |
Next up was the sides of the box. I was lucky enough to have scrap plywood to finish this project. I cut all of the sides to a width of 5″ first so it would be consistent. Then I cut the sides to a finished length of 5″ x 23-1/2″ and the front and back to a finished length of 5″ x 17-1/2″ |
 |
For the joints of the boards I cut a rabbit joint on the two side boards. I cut a 1/2″ wide x 3/16″ (the width of the pegboard) deep rabbit. After I finished the top of the boards, I then went back and cut another rabbit joint that was 3/4″ wide and x 1/2″ deep. This will allow the front and back boards to fit into the sides to make a solid joint. I used my router table to cut the deep end of the rabbit and finished the width on my table saw. |
 |
After I had all of my sides cut, I then cut a hole for the dust collector port to be attached too. The width of the port I’m using is 2″. I could have simply used a jigsaw to cut this opening. I had a 1-1/2″ Forstner bit and I figured that was big enough. |
 |
To hold the box together I used wood glue along all of the joints. |
 |
To help make the joints even stronger I used (3) 1-1/4″ screws on all the sides of the box. |
 |
After the box was together, I then cut a baffle. The baffle is really important to the air flow of the table. First it reduces the amount of space that has to be suctioned in half thus creating a higher suction. Secondly it helps to distribute the air flow across the top of the table evenly. |
 |
To make the baffle I custom cut the length and width to box. I went from the top of back to the bottom of the front to get my length. You’ll want to make this a little snug as you need to get this as air tight as possible from the bottom and sides.To help make this more air tight I ran a thick bead of glue along the sides of the baffle. If I had some caulking it would have been better, but this seems to work pretty well too. |
 |
I attached the top of the table by pre-drilling all of my holes into the top. I then slightly countersunk a 1″ screw in all four sides of the table. |
 |
To help reduce the table from sliding around I installed a 3/4” Universal Rubber Bumpers on all four sides of the table. |
 |
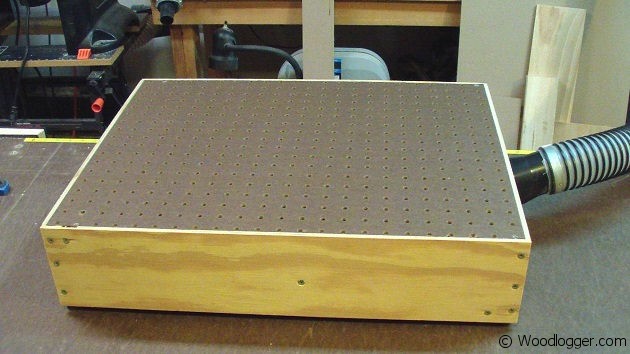
I installed the Universal Dust Port over the hole that I cut previously. |
 |
Here is the completed table. I tested it out and it seems pretty solid. |
Finishing
Not a lot to finishing this one. I did attach rubber bumpers to the bottom of the box. That’s really a must as any sander is going to vibrate this box like crazy.

Also I made a bench dog cleat hybrid that I could insert into the table. I can use this to help keep objects steady as their being sanded.
Items used to complete this project
