


I saw a window bird house nestbox awhile back and thought what a cool thing to make. I actually bought my dad one for Christmas last year, and decided to make one on my own. I looked at a few different plans to get some ideas, and for the most part I followed a plan that I saw in the book: Bird-Friendly Nest Boxes and Feeders: 12 Easy-To-Build Designs that Attract Birds to Your Yard I made a few changes to the dimensions on mine. Plus I wanted to attach suction cups to the back of the house so that I could attach to a window. The clear plastic is sized at 5×7 so you can find it in most stores that sell picture frames. I had some plastic sheets that I had leftover from a previous project. I was able to cut mine down to size using my tablesaw. I’m really not sure if there is a “best practice” way of cutting plastic sheets, but it worked pretty well for me.
This really was a great little project that can be done in a weekend. If you follow the plan from the book it shows hanging the feeder in a traditional fashion, but I thought putting this on my daughters window might be fun (and educational) for her. Although after completing this one it means I will probably have to make another one for my son’s window. If you make one of these I would love to hear from you. As always I will put links to some of the things I used at the end of post. Also check out “my attempt” at putting a video together on how to make this. If you make one of these be sure to post it over on the WoodLogger Facebook Page. I’d love to see how yours turns out.

Materials
For the lumber I used Cedar that I purchased from Lowe’s. I was able to do the whole thing using only 1 board. For the back I used a scrap piece of plexiglass that I purchased at Hobby Lobby. The opening is 5″x7″ so you can find a pre-cut piece pretty easily at most stores. I used an exterior rated glue with all my joints(except the bottom). To hang the house I attached 4 suction cups to back. My house will hang from a window. I was able to build the entire project for under $25.
- (1) 1″ x 8″ x 6′ Cedar Board
- (1) 5″ x 7″ plexiglass – back
- (4) Suction Cups with screws
Milling & Assembly
  |
To start on this project I cut all of my pieces according to the plan. I then cut the sides of the house with a 45° edge for the roof line. Then I cut a 1/8″ deep groove 1/4″ in from the side.After that I cut the front of the house at a 45° angle to create the roof line. |
  |
After cutting the roof lines on the front of the house I then drilled an entry hole. I used a 1-1/4″ fostner bit for this.For the back of the house I cut a scrap piece of plexiglass down a 5″x7″ size. |
  |
When I started the assembly I started by attaching the sides to the bottom of the house using 1-1/4″ screws. I didn’t apply any glue so that I could remove it in the future to clean it out.After I attached the sides to the bottom I simply slid the back into the grooves. |
  |
For the front of the house I used exterior rated glue. I also tacked the front down using brads. |
 |
After everything was assembled I drill five holes in the bottom of the house. This is for drainage in case any water gets inside. In hind sight I should have drilled the holes before final assembly. |
 |
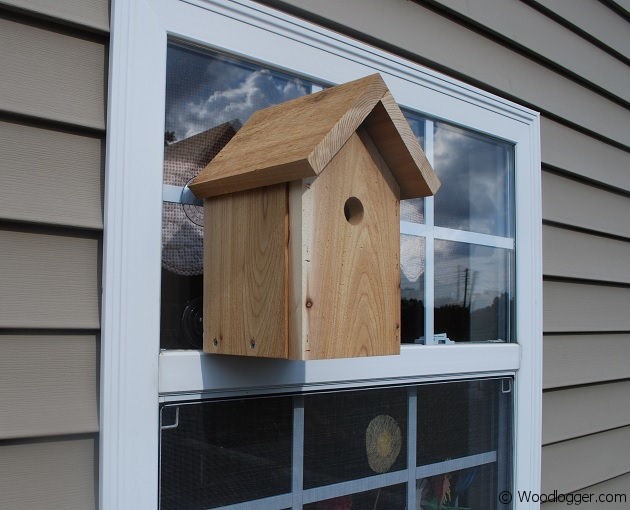
Here is the completed house with four suction cups attached to the back. I mounted it to a window and I’m really surprised by how strong the suction cups are. |

Finishing
I made this house of cedar so it’ll age just fine outside. I attached suction cups that had screws with them. I bought a kit for that and it attached very securely to my window.
Items used to complete this project