


As always I will put links to some of the things I used at the end of post. Also check out “my attempt” at putting a video together on how to make this.

Materials
Not a lot for this one. I was able to pickup both of the boards I used for this at a local hardware store. You could easily make two or even three of these at the same time for just a slightly longer maple board.
- (1) 3/4″ x 6″ x 6′ Maple Board
- (1) 3/4″ x 2″‘ x 4’ Walnut Board(I only used about a 6″ length for the handle)
Milling & Assembly
 |
I started by planing the maple stock down to 3/8″. A thickness planer is the way to go if you have one, but you can still get it done with a planer joiner. |
 |
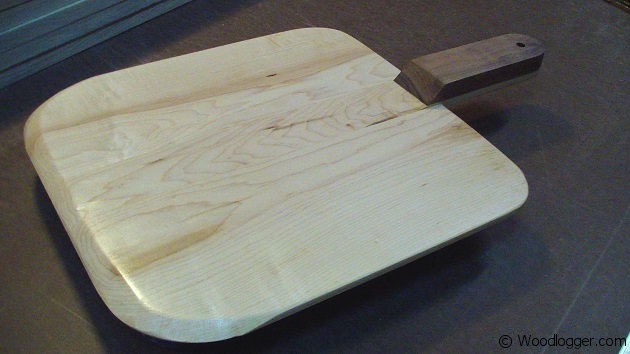
Next up was rough cutting the lumber. The pizza peel consists of 3 boards edge joined. The outside boards are cut to a length of 5-1/2″ x 14″ and the inside board was cut to a size of 2″ x 20″. |
 |
After cutting the maple boards to length, next up was the walnut handle. For the handle I cut one end at a 45 degree angle. The size of the handle is 2″ x 6″. |
 |
For glue up I taped a piece of wax paper to my bench. This will help the project from being a mess. |
 |
For glue up I used a water proof glue. Clamping things up was pretty easy. I used a scrap piece of wood to protect the sides. |
 |
For the handle I used the same water proof glue and clamped it up as shown. |
 |
For the corners of the peel I used a quick corner jig. |
 |
I used the same jig for the handle to get a rounded look. |
 |
Next up was cutting the rounded ends off the peel and the handle. I used my bandsaw for that. |
 |
I also drilled a hole into the handle. I think was more for form than function, as I don’t see hanging this up, but it does add to the character of the piece. |
 |
To get the beveled end of the peel I used a power sander. I really thought this was going to be the hardest part of this project, but it really was a snap. I was able to get a pretty sharp point and it was balanced on both sides pretty well. |

Finishing
To finish the peel, I sanded it using a standard low grit, and moved my way up to a 220 grit. I also broke the edges of the peel with sandpaper and gave it a round over look. To finish it I used a product called salad bowl finish. It’s supposed to be safe for wood that comes into contact with food. I applied five coats to the peel.

Finishing the Pizza Peel, I used five coats of salad bowl finish.
Items used to complete this project
