


As always I will put links to some of the things I used at the end of post.
Materials
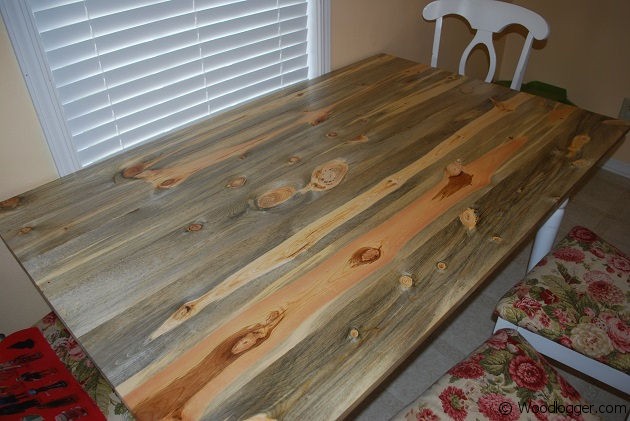
For the lumber on this one I was able to pick up pine boards from our local Menard’s. The lumber we chose had a lot of character. I tried to pick the straightest boards there and I was able to get away without any planing.
- (7) 1″ x 6″ x 6′ Pine Board
Milling & Assembly
 |
For the rough cuts on this project I did standard cross cuts on the table saw. I got lucky with my boards all being straight enough that I didn’t need to plain any of the boards. For my table I cut the boards to a rough cut length of 62″. |
 |
For the joinery on the table I decided to use pocket holes to edge join the boards together. I used my Kreg Pocket Hole Jig to drill pocket holes about every 8″ on my boards. If you haven’t ever used one of these it really is one of my favorite tools. Click this link to see more about it. |
 |
After I had all of my pocket holes drilled in my boards, I joined them using 1-1/4″ pocket hole screws. I didn’t use any glue for this project. |
 |
After all of the boards were edge joined I went back and finish cut the table to its final length. For the cut I used a circular saw with a very fine blade installed in it. To keep the cut straight I used a simple edge guard that was held down with clamps(not pictured). I was really surprised how well this worked. |
 |
After the table was cut to its final length I simply used L brackets to hold the table to the existing frame of the old table. |
Finishing
To finish the table, I tried several different sanding techniques. All of them had a way of dulling the color and the character of the boards. My wife insisted NO sanding. So instead of doing typical low grit to high grit sanding, I very lightly sanded by hand with a high grit sandpaper. The finish I applied to this, was a product called Salad Bowl Finish. I’ve used this product in the past with success, but was a little apprehensive about using in on a kitchen table that will take a lot of abuse. I applied 6 coats to it and it seems to be holding up pretty well. Here is my disclaimer on this one though. This whole approach to finishing was a new one for me folks, my attitude on this is we’ll see how it looks in 6 months. Worst case I wasted a couple of hours of time and $35.
Items used to complete this project
