Golf Ball in a Block of Wood
- Facebook37
- Twitter15
- Pinterest158
- Mix
- Tumblr2
- Print59
- E-mail30
- 301shares
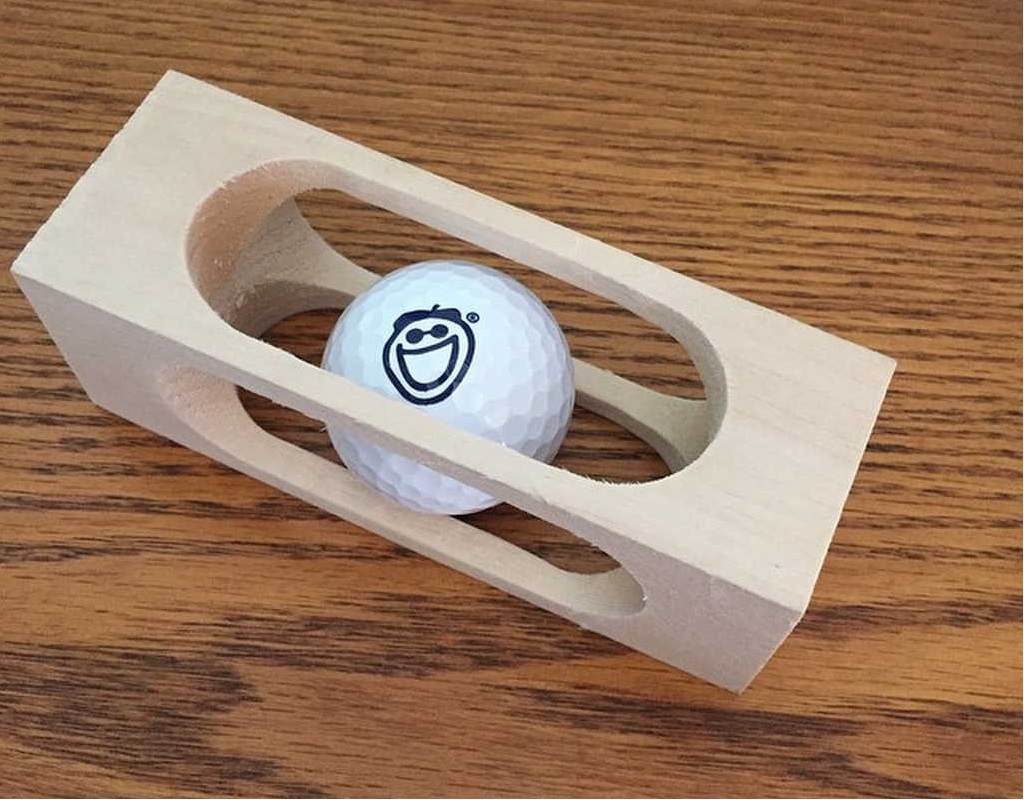
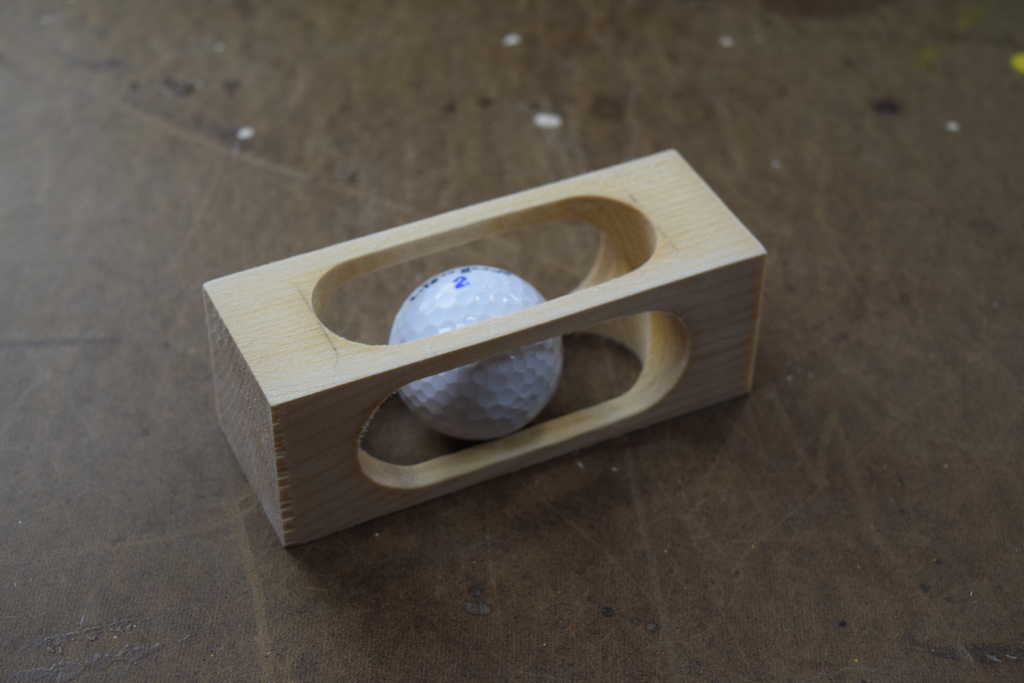
A few years ago, I came across a golf in a block of wood and instantly knew I had to try it myself. I finally got around to it, and it turned out to be a super fun and simple project! All you need is a block of softwood (I used basswood) and a golf ball.
I started by trimming the wood down and using a drill press to create the cavity where the golf ball would fit. Here’s the interesting part: to actually get the ball into the wood, heat up a pan of water and soak the wood block for a few minutes. The heat causes the wood to expand just enough for you to squeeze the golf ball into the opening. As the wood cools and contracts, it traps the ball inside!
With just a few basic tools and about an hour of your time, you can create this clever optical illusion that will surely impress.
If you make one of these be sure to post a picture of it over on the WoodLogger Facebook Page. I’d love to see how yours turns out.
Material List
- (1) 1-3/4″ x 1-3/4″ x 5″ – Softwood (I used Basswood)
Cut List
- Drill out center section using a 1 – 1/4″ Forstner Bit
Milling & Assembly
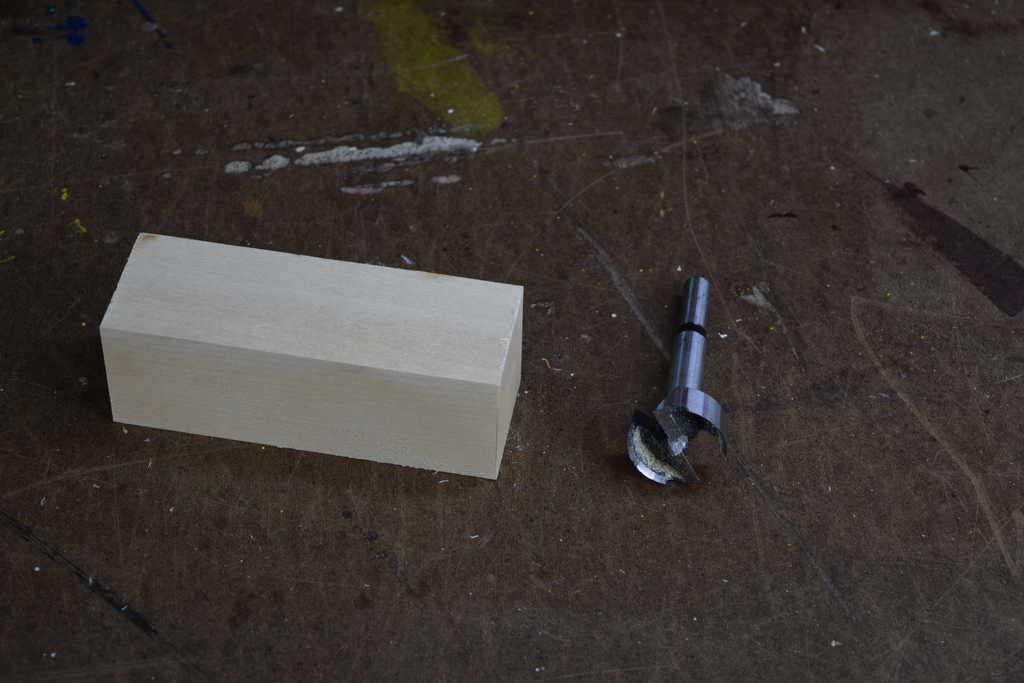 | To get started on my block; I cut down a block of bass wood to 1-3/4″ x 1-3/4″ x 5″. To drill out the middle of the block I used a 1-1/4″ Forstner Bit. |
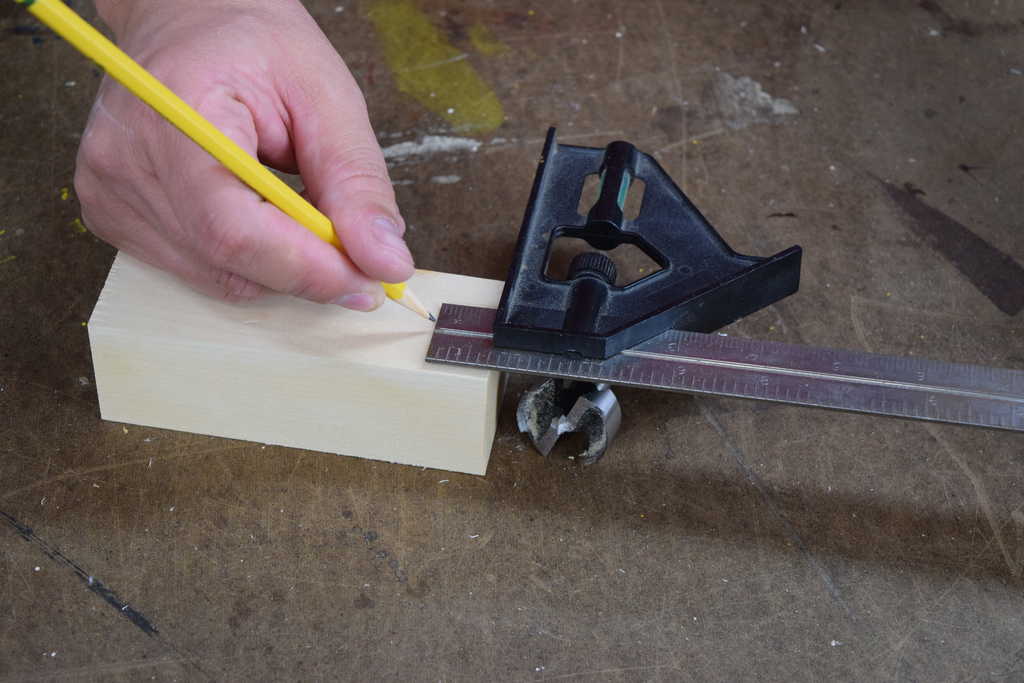 | I marked the ends of the block at 3/4″ this will be my guide when it comes to cutting out the middle. I also measured to the middle of the block to give myself a reference point when centering the block on the drill press. |
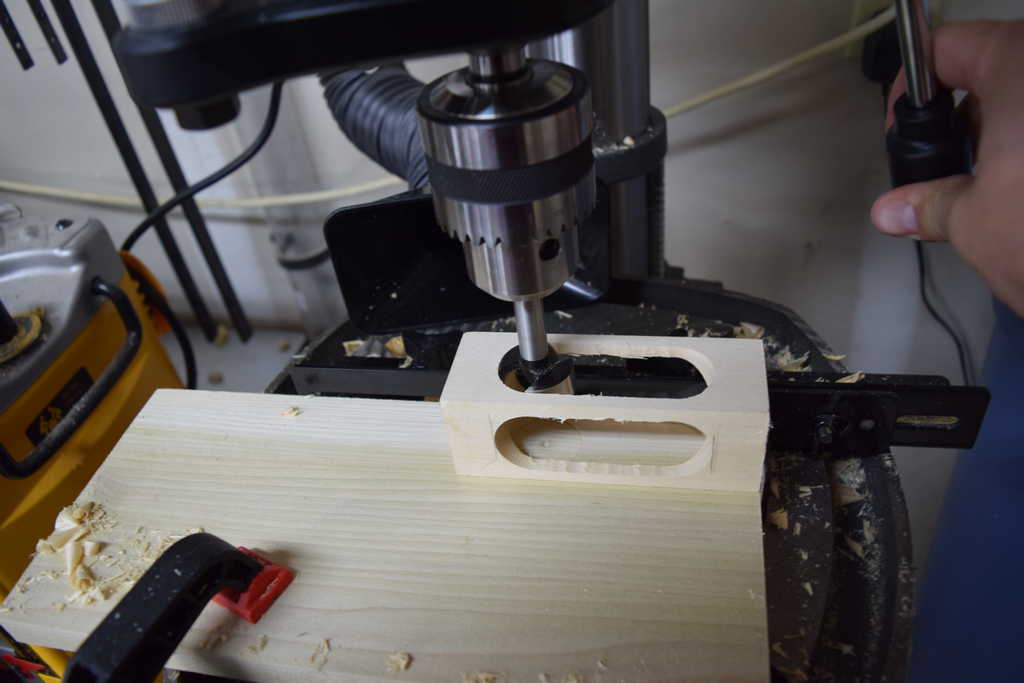 | Next up I used a 1-1/4″ Forstner bit to clear out the middle of the block I did both sides all the way through. I put a piece of scrap underneath my block to protect the bottom of the block and my bit. |
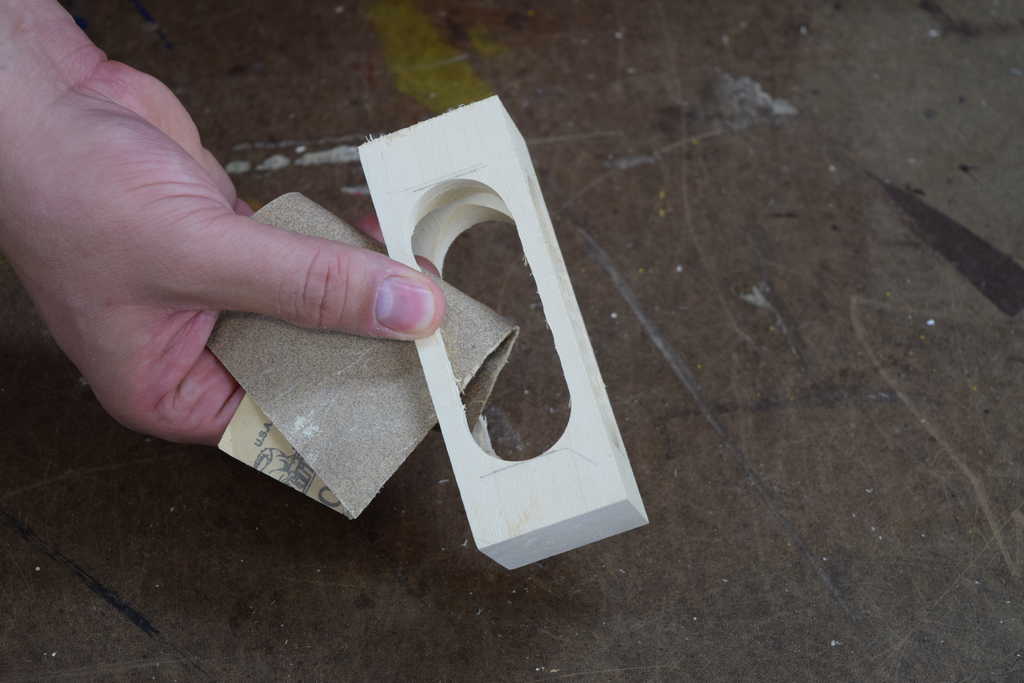 | After I had my holes drilled out; I sanded all over the block and cleaned it up. |
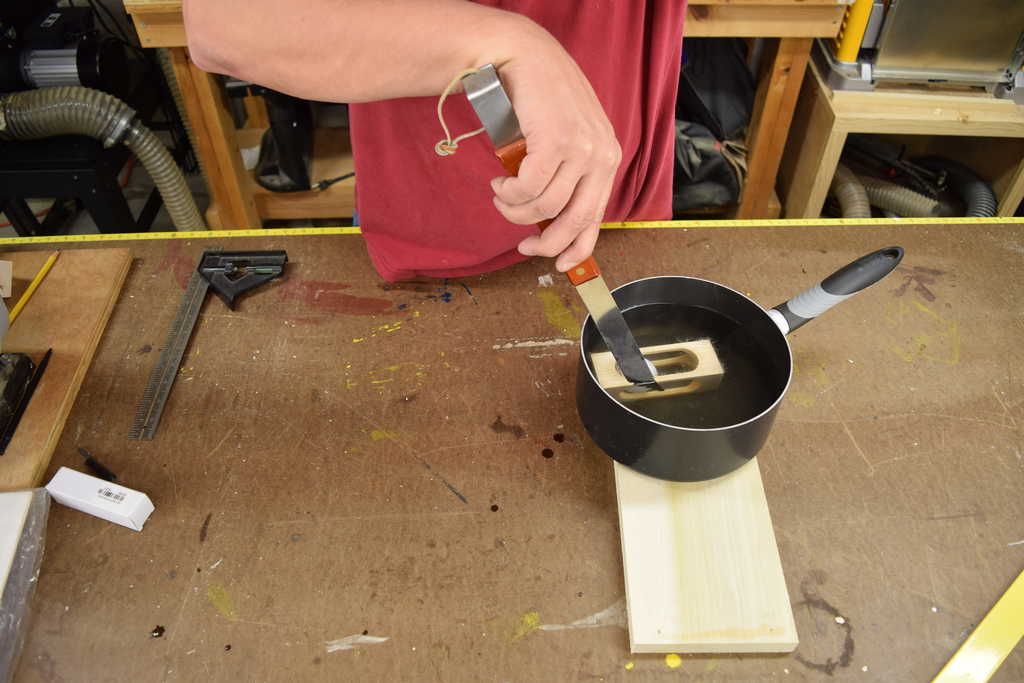 | Next up I heated a small pot of water to near boiling and put my block in it for approximately 4-5 minutes. |
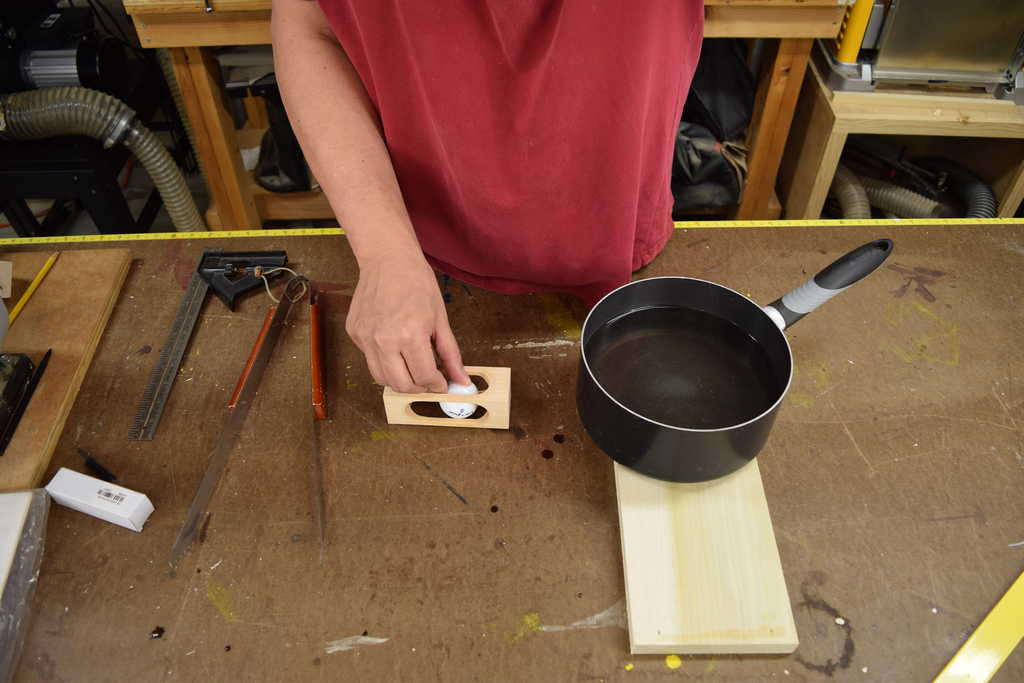 | I then took the block out and squeezed the golf ball in between the rails. If it doesn’t want to go then you may need to soak your block longer or use hotter water. It takes a little bit of pressure to get it in there. I’ve made 4 of these and one of them I busted the rails. If it simply won’t go don’t force it, and let it soak a little longer. |
 | Depending on what you’re going to do with this you may want to apply some finish to the block. If so, be sure to cover the golf ball with some tape. |
- Facebook37
- Twitter15
- Pinterest158
- Mix
- Tumblr2
- Print59
- E-mail30
- 301shares
Hi
So what if I wanted to buy one of these as a gift? Any idea where I could find that? This is the perfect combination of some of my dads favorite things, and father’s day is around the corner :)
hi rachael, I am Paul from Candymanssawdustpile, and I am from Oakmont Pa site of this years U S Open Golf Tournament. I am in the process of making some of these which will have a commerative U S Open golf ball in it. Unfortunately, those golf balls cost $15.00 each, so if you wanted one I could make it and sell it to you for $29.00 which would include shipping to you before Fathers Day. Please let me know
Looks like a great gift for my golfing brother-in-law. Do you still have any available?
Hi Rachael, I have some made but not a tournament golf ball just a plain old golf ball. I am not trying to under cut Paul or take any business from him, I sell mine for $15.00 w/S&H included. If you are interested let me know. My email is dailer47@live.com. I am from Michigan.
Pretty amazing. Love it.
Hey, this looks like a really cool little project. I intend to give it a try if I can find some 2″ Basswood.
In case there might be some interest, the diameter of the American golf ball, according to Google, is 1.68″. The European ball is slightly smaller. Using a 1 1/4″ drill bit will cause the slot in the wood to be about 0.43″ smaller than the diameter of the ball. Project should work providing the hot, wet wood allows it to bend sufficiently to accept the ball diameter.
I made something similar to this it was a bass block with a nail in it and also did a light-bulb with a basswood arrow through the bulb. Tricky drilling the hole in the bulb.
TaDa….. I just did 2 of these they turned out very nice. Now I have to figure out what to do with them. I have a little sanding to dress them up and maybe might stain them. I have a craft show coming up I would like to know roughly how much to sell them for. I have enough wood to make 2 more, they were easier to make than I thought all in all I think it took about 15 minutes to cut then I soaked them in boiling water for about 20 minutes each the balls slipped right in with no problem. I better not count my chickens before they hatch.
Hah, that’s awesome. This was definitely a fun one for me.
Yeah was fun now I have 4 made (knock on wood) none broke, If anyone knows how much to charge for these please let me know. I am guessing about $4.00. tell me what you think
Two guys were selling them one for 25 the other for 15
To price out anything, figure what you should be paid for in a day (8hours) at $400 / day , gives $50 per hour. Now many can you make in an hour. Add cost of material.
That should be your selling price. So if you make 4 in hour 12.50 + material.
Adjust if you value your daily rate lower.
Thank you that will help some. Many people are cheap at the craft shows. They work at their jobs and get $15.00 per hr+, they don’t take in consideration how long it takes to make something a lot of them think that you are over charging for your items. My hobby is making walking staffs I ask $40.00 average. each one takes about 35 hours to make from start to finish, all hand carved, the staffs I find when I am out walking I pick them up and recycle them. Then there is the stain and finishes after complete I think I might be making under $1.00 hour. I don’t do it to get rich just to give me something to do since I am retired with little spare time on my hands, I mostly enjoy seeing the smile on the persons face when they buy one.
A lot of folks underprice thier time. As you say you are doing it for fun. Some people begin as fun but expand then don’t know how to price the craft correctly.
Mine is just a suggestion and when the snow melts I hope to make a couple for the grandkids.
No need to,price those
I have found that the first few take longer to make. Once you have those done the others take less time and you can even sort of create a production/assembly line setup. I will try this golf ball project.
I made some with pro, college, and local interest logos on the golf balls. I found that they sold before other regular golf ball items. I have sold mine as inexpensively as $15 and as high as $40
My golf balls came from free box at a garage sale. I only have 2 made.
Brilliantly simple project, but great fun. Ideal gift for the golf widows.
I’ve made 2 of these so far for golfing friends. What a great little project; thank you for sharing.
I see in the video that you left your’s unfinished. But I wanted to stain and finish mine for better contrast. But that needs to be done after the ball is installed. So what I did on my 2nd one is tightly wrap the ball in Saran wrap and put a piece of cellophane tape on to keep it in place. Worked very well and I didn’t have to worry about getting stain or finish on the ball. And easy to take off when you’re done. BTW, 8 minutes in almost boiling water worked well for me.
Another thing I did is use my spindle sander after drilling which is faster than hand sanding since you are contacting 2 surfaces at once. If you’re making a bunch of these you can clamp on a fence (opposite the sanding side) to get straight, repeatable results.
After the hot water soak to get the ball in I noticed that one of them ended up being quite a bit out of square after it dried, probably due to the grain differences. So on my next one I will boil the block before I even start and see if that helps.
is it possible to make it out of hardwood like oak or maple ? Anyone tried it with hardwood ? Thanks.
Just made one out of soft maple. Extended the length to 6″ to give the pillars a little more flex and boiled for about 10 minutes. Worked fine.
I just made one from a piece of pine and it worked perfectly! Thanks for the instructions, I think I’ll make a few to give away. It’s a fun project.
I love the idea, so I started one this evening but I made a mistake.
I drilled my 1.25″ hole in this pattern: “outside, outside, then middle”.
That worked fine for the first oblong hole.
When I flipped it 90 degrees and started to drill the second oblong hole, the “middle” hole (which would connect to the two outside ones) didn’t have the stability on the thin crossing pieces and it snapped pretty quickly.
My suggestion: Drill: “Left, Middle, Right” so that each hole still has some wood supporting the cross pieces.
Tomorrow night: Take two.
Interesting observation! I must have lucked out, think I did it the way you said. I have made 4 with help from grand daughter (she did the water and putting ball in side. We also wrapped ball in plastic wrap before insertion, sanded with Dremel before putting ball in. For us water temp back off when boiling starts, reduce heat to simmer, then hold wood in for 5 minutes.
Grand Daughter will give the as presents. Took photos , oh she is 11
Good luck